In addition to lots of positive feedback (thank you all for your comments!), my image of startrails in Sossusvlei, named “A Desert’s Sky”, has also raised lots of questions all around the web. How did you do it? Which settings did you use? What equipment? Here’s a little summary of how this image was created.
!WARNING! This article leans more towards the technical side of my photography. If you’re not interested in wasting minutes of your precious life reading stuff about things you don’t want to know or programs you are never going to use – just scroll down a bit to take a look at the image.
In order to really appreciate this article you will need some basic knowledge about creating startrails and editing in Adobe Photoshop. If you are new to the subject of startrail photography I highly recommend you to read either EJ Peiker’s Article on Startrail Photography or Floris van Breugel’s in depth tutorial The Twilight Hour – Photographing Star Trails and Static Stars. Both articles are great resources and served as a solid foundation for my ventures into nighttime photography. Shooting startrails in Sossuvlei was a clear goal for my trip to Namibia, and I had done my homework.
I reached the location about one hour prior to sunset. Being there early is important – you will need some time to find a composition, previsualize and double check your equipment and settings.I walked straight to the dead tree that I had scouted in the morning. But before setting up I had to find the center of the startrail’s rotation to position it in the frame. In the southern hemisphere there’s unfortunately no real pole star like Polaris in the north. You can either approximate the celestial pole with the help of the Southern Cross or, as I did, use a smartphone app (I used the iPhone’s “SkyView free”) to locate Polaris and “invert” it’s position. Now that I knew where the center of the startrails would be I looked for a nice comp with the tree in the foreground. When I was happy, the sun was still above the horizon, leaving me enough time to set my camera and remote timer and double-check everything:
- Canon EOS 5D Mark II: ISO 200, f/5.6, set to bulb mode; long exposure noise reduction: off; mirror lock-up: off
- Canon EF 17-40mm f/4L USM: 17mm, manual focus, no filters, dust free front element
- Canon TC-80N3 Remote Timer: exposure time: 5 minutes; interval: 1 second (the minimum time the camera needs between exposures); frames: infinite (until the battery runs out)
- Gitzo GT1541T Tripod: not the sturdiest of them all (but hey - I'm travelling) - I only used the first two leg sections to maximize stability
- RSS BH-40 Ballhead: all knobs locked.
- Battery: full
A sandstorm had been approaching during the last two hours and since I didn’t know if it would intensify and eventually hit my equipment, I wrapped my camera and lens tightly in a plastic bag – leaving the front element clear of course. When everything was ready the sun had already dropped behind the distant dunes of Sossusvlei. It was exactly 50 minutes past sunset when I pushed the start button on my remote timer to trigger the series of exposures.
When I returned to Sossusvlei the next morning to pick up the camera I was relieved: It hadn’t been blown over by the wind and skipping through the images confirmed that everything had worked out. Next up was the tough part: post production.
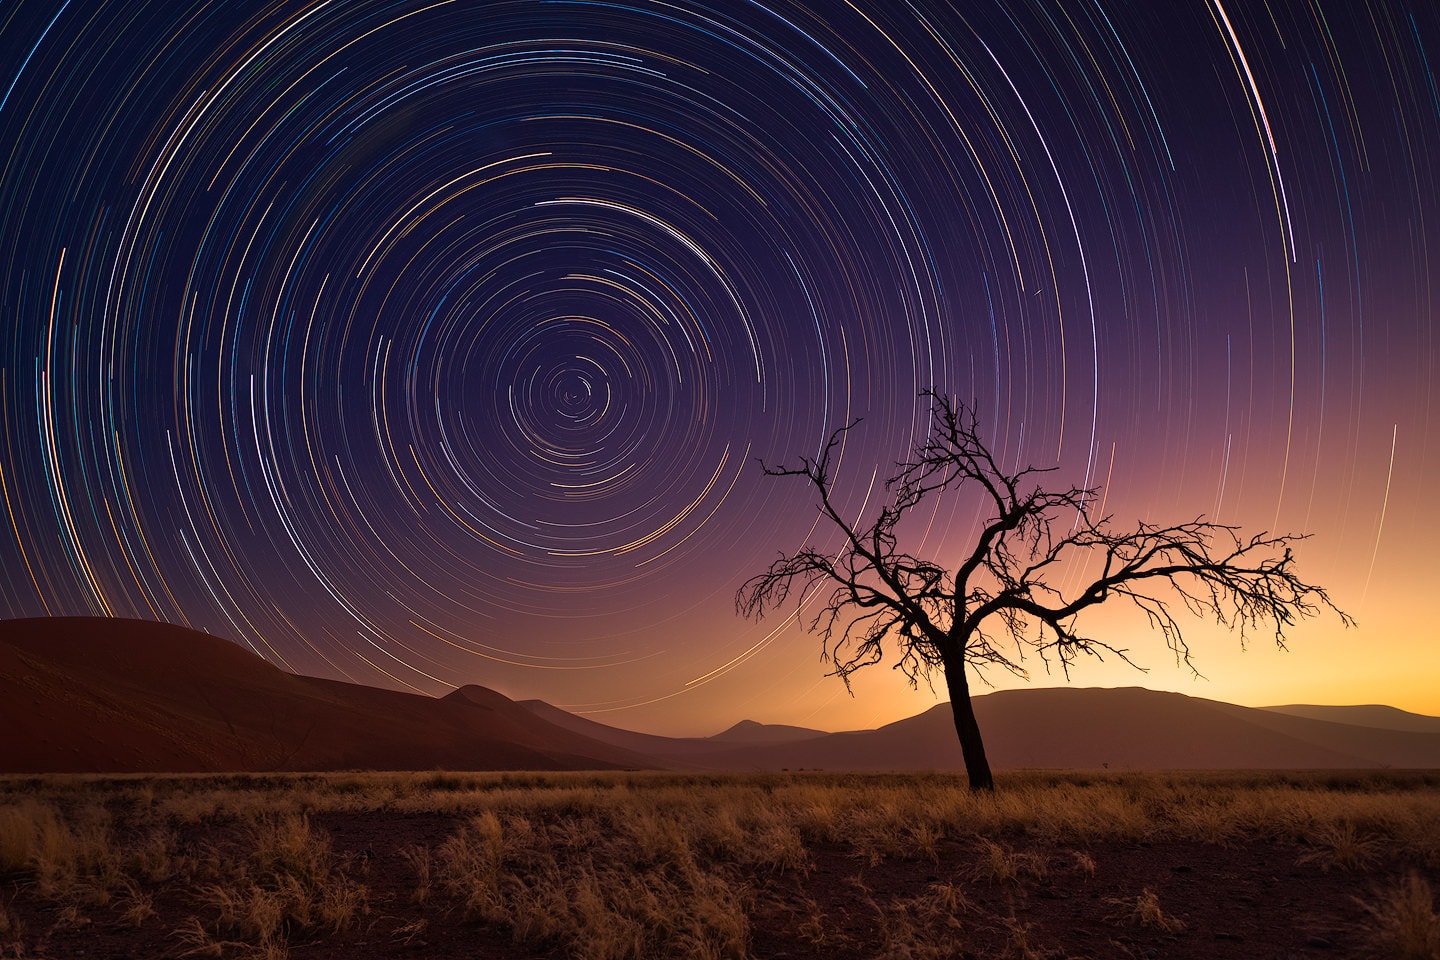
A Desert's Sky
In Adobe Lightroom I set white balance to daylight for all exposures (a total of 50, of which 46 made it into the final image – more on that soon). Next I exported low resolution TIFF files (1500px on the long side) to experiment with the stacking (using low res files safes a lot of time in this process of going back and forth). In Adobe Photoshop I used the statistics script (File -> Scripts -> Statistics) with the stack mode set to maximum to create the startrails. I did several versions of the trails by subsequently leaving the brightest exposure out of the stack (the darker the brightest exposure in the stack, the more startrails will be visible).
When I was happy with the result I re-exported the files out of Lightroom – this time as full resolution, 16-bit TIFF files – for maximum quality. I could have used the statistics script again to generate the final stack of images, but instead I used Floris van Breugel’s excellent and free Star Trail Stacker script for Adobe Photoshop. This way I was able to reduce the gaps in the startrails to a minimum, thus creating a file that I could print much bigger.
At this point, when I thought I was almost finished, I was confronted with my personal startrail-nightmare: NOISE. The warm temperatures in the namibian desert, combined with my use of the live-view mode (to check composition, focus,…) and the long exposure times had heated the camera’s sensor which created a crazy amount of fixed pattern noise. There was no way any noise reduction in Lightroom or Photoshop could have handled it. I couldn’t believe it! All my efforts gone to waste…
It took me a few months before I picked up the raw files again. I had read a few articles about dark frame subtraction, where you shoot a frame with the lenscap on after finishing your last exposure for the startrails. This way you get a black frame with nothing but the sensor noise (which is constant at a given temperature and exposure time) in it. I tried to recreate such a black frame at home, but since I couldn’t match the temperature, the noise differed from the original files. What looked promising seemed to be a dead end as well. But then I had an idea: the noise existed in all the shots – why not isolate and then subtract it. But how can you isolate something that exists in 49 shots?
Again I used Photoshop’s statistics script. This time I set stack mode to average and voilá: there it was my (almost) dark frame. From here on everything went as planned again: I created my startrails in Photoshop and added the dark frame as a layer. The blending mode of the dark frame was set to difference and after playing with the opacity slider I was able to all but eliminate the noise. Then I added the first of my exposures (which luckily didn’t show the noise) in various blending modes and painted in the foreground and sky. Finally it was just a matter of global and local contrast adjustments.
To sum it all up, here’s what went into the final composite of the image:
- The stack of 45 exposures (taken from 70 minutes past sunset) for the startrails (stacked with Floris van Breugel's script)
- An average of the 45 exposures as my dark frame (created with Photoshops statistics script set to average mode)
- The first exposure of the night (taken 50 minutes past sunset) for the foreground and sky color.
Additionally the creation of this image involved a fair amount of trial and error, heavy thinking and lots of reading. It probably cost me around 60-70 hours of my life and in some way it was present in the back of my head all the time. But all these efforts are outweighed by my satisfaction with the result and the feeling of having solved this challenging puzzle.
Startrails in Sossusvlei
Namib-Naukluft National Park
Namibia
Canon EOS 5D Mark II
Canon EF 17-40mm f/4L USM @ 17mm
ISO 200, f/5.6, 300 seconds (46 exposures stacked)
Gitzo GT 1541T
Canon TC-80N3 Remote
21. November 2011
Dusk to night

Joerg, you are awesome!!
thanks for sharing! I was always on the look for the sensor noise, i read about dark frame subtraction, it never worked for me, now i know, it has to be with same temperature, i always tried with the one made at my room :(, that was an insight, i will try again soon. thanks man!
thanks! i’m glad that you found my article useful!! let me know if you are successful!!
best,
joerg
p.s. keep in mind, that for this averaging technique you will need lots of exposures and that it will probably mess up your foreground a bit (you will have to mask it out or paint in another exposure).